How to Configure User Queries in iDempiere
Introduction
User Queries is a setup screen where a saved search filter is created for a specific screen in iDempiere. Instead of typing the same search criteria repeatedly, a person can save it once and reuse it whenever needed.
This screen is used across day-to-day business screens where staff regularly look up records, such as reviewing changes, checking pending documents, or tracking specific transactions.
By saving common searches as reusable queries, teams look up information faster, apply the same review criteria consistently, and reduce time spent re-entering search conditions during daily work.
Process Flow

Business Rules
- Active queries are available for selection in the Select Query list.
- Inactive queries are hidden and cannot be selected by users.
- A query marked as Default loads automatically when the screen opens.
- Only one query per screen and section should be marked Default at a time.
- Each query is linked to one specific screen and one section within it.
- A query can be limited to one User or Role, or left open to everyone.
- The record source selected determines which records the query searches.
- The saved filter condition decides exactly which records are shown to the user.
Prerequisites
- The target screen and its relevant section identified.
- The record source linked to that screen section confirmed.
- The User or Role identified, if the query needs to be restricted.
- The search condition or filter logic decided in advance.
Navigation
Menu → System Admin → General Rules → Security → User Queries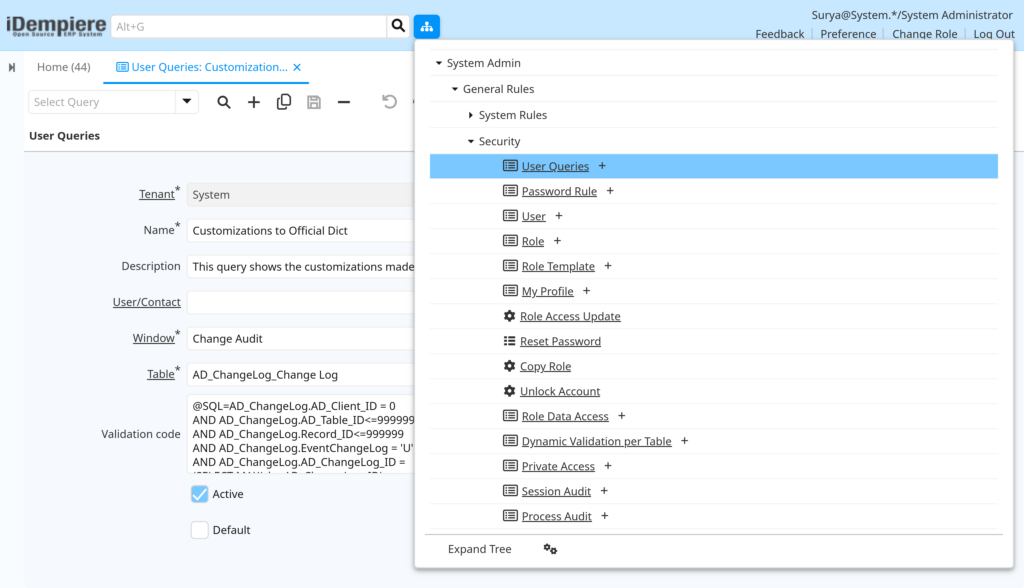
Opening this screen shows a list of previously saved queries. A new record can be created to define the query name, description, the screen and section it applies to, the record source, an optional User or Role restriction, the filter condition, and whether it is Active or Default.

Configuration Steps
Step 1: Identify the Screen and Section
Every query must belong to one specific screen and one section within it, so the correct screen and section are chosen first before anything else is filled in.
Instructions
Open the entry form and choose the target Screen. Then choose the matching Section for that screen.
| Field | Sample Value | Description |
| Screen | Change Audit | The business screen this query will run against. |
| Section | Change Audit_Change Audit | The specific section of the screen linked to the search. |
Step 2: Select the Record Source
The record source tells the system which set of records the query will search through. It is usually filled in automatically once the Section is chosen.
Instructions
Confirm the Record Source field matches the section selected in Step 1. Change it only if it does not match.
| Field | Sample Value | Purpose |
| Record Source | AD_ChangeLog_Change Log | Defines the group of records the query searches. |
Step 3: Name and Describe the Query
A clear name and description help other users understand what the saved query does before they select it.
Instructions
Enter a short, meaningful Name. Add a Description explaining what the query is meant to find, in plain business terms.
| Field | Sample Value | Purpose |
| Name | Customizations to Official Dict | Identifies the query in the selection list. |
| Description | This query shows the customizations made to official entries in the dictionary | Explains the intent of the query to other users. |
Step 4: Restrict Access (Optional)
A query can be kept open for all users, or limited to one person or one role, such as when a query is only relevant to a specific team.
Instructions
Leave User and Role blank to share with everyone. Otherwise, select a specific User or Role to limit visibility.
| Field | Sample Value | Purpose |
| User | (blank) | Restricts the query to one specific person, if filled in. |
| Role | System Administrator | Restricts the query to users holding this role. |
Step 5: Define the Search Condition
This is the core of the query. It states exactly which records should be returned when this query is selected and run.
Instructions
Enter the search condition describing the records to find. Keep the logic specific so results stay relevant and manageable.
| Field | Sample Value | Purpose |
| Search Condition | Shows only updated records matching the latest change for each entry | Controls exactly which records the query returns. |
Step 6: Set Active and Default Status
The Active and Default settings decide whether the query can be used at all, and whether it loads automatically for users.
Instructions
Keep Active checked so the query is available for use. Check Default only if it should load automatically on this screen.
| Field | Sample Value | Purpose |
| Active | Checked | Makes the query available for selection. |
| Default | Unchecked | Controls whether the query loads automatically when the screen opens. |
Common Issues and Resolutions
| Issue | Cause | Resolution |
| Query is missing from the selection list | Query is marked Inactive | Open the query and mark it as Active. |
| Query does not load automatically | Default is not enabled | Enable Default on the intended query for that section. |
| Query returns no results | Search condition is too narrow or incorrect | Review and adjust the search condition. |
| Query is visible to the wrong users | User or Role field left blank | Assign a specific User or Role to limit access. |
| Query appears on the wrong screen | Incorrect Screen or Section selected | Recreate the query with the correct Screen and Section. |
| Two queries load at once | More than one query marked Default for the same section | Keep only one Default query per screen section. |
| Query stops returning expected records | Underlying record source or fields have changed | Update the search condition to match the current fields. |
Next Steps
- Review Role setup if queries need to be shared across a team.
- Confirm the target screen and section setup before creating queries for a new screen.
- Create additional queries for other frequently used screens.