How Does Work Broadcast Message window in iDempiere
The Broadcast Message window in iDempiere allows administrators to create and display important announcements or alerts to users. It is useful for communicating system updates, downtime notices, policies, and other operational information.
Business Rules
- A Broadcast Message must have a Tenant and Organization before publishing. Broadcast Message content is mandatory.
- Broadcast Type controls when the message is displayed. Target defines the recipients: Client, Role, or User. If the target is Role, a valid Role must be selected.
- Broadcast Frequency controls how often or how long the message is displayed.
- Test Broadcast Message allows users to review the message before publishing.
- Publish Broadcast Message requires confirmation before activation. Run as Job allows publishing to run as a background process.
- Notification Type defines additional notification methods, such as Email. Immediate messages are automatically set to Just Once.
- Acknowledgement is tracked for messages configured for acknowledgement or expiration. Role-targeted messages are delivered only to users with an active Role assignment in the current Tenant.
- Broadcast messages can include clickable links to related records. Translated messages can contain dynamic values that are resolved for each recipient. The Expired option makes a broadcast inactive.
- Message Log records message delivery for each user/contact. Translation stores language-specific versions of the message title and content.
Prerequisites
- An active Tenant and Organization must be configured in iDempiere.
- User Roles must be defined if the Target is set to Role.
- Users or Contacts must exist in the system to receive and log broadcast messages.
- Supported Languages must be set up in System Admin if translations are required.
Navigation
Menu → System Admin → General Rules → Broadcast Message
Upon opening the window, users see the Broadcast Message header form along with the Message Log and Translation tabs below it.
Configuration Steps
Step 1: Create the Broadcast Message
This step defines the core message content, its type, audience, and display frequency, which are required before any message can be tested or published.
Navigate to the Broadcast Message window, enter the message text, select the Broadcast Type, choose the Target, and set the Broadcast Frequency.
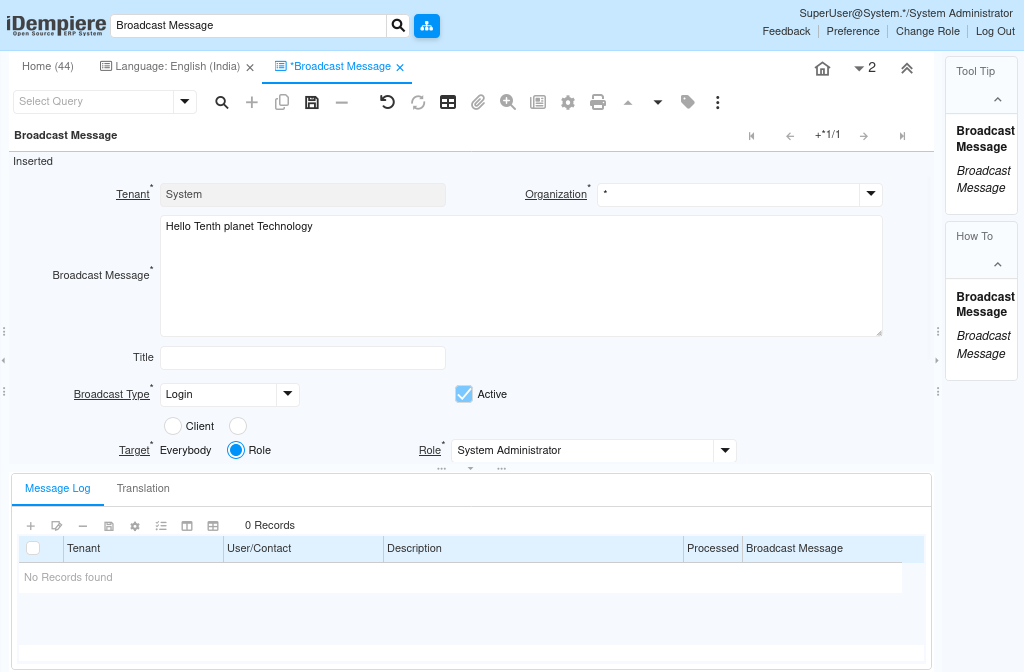
| Field | Sample Value | Description |
| Tenant | POTS | Identifies the tenant the broadcast message belongs to. |
| Organization | * | Identifies the organization scope for the message. |
| Broadcast Message | Hello Tenth Planet Technologies | The main message content displayed to the target audience. |
| Title | (blank) | Optional short heading shown with the message. |
| Broadcast Type | Immediate + Login | Defines when the message is triggered for display; selecting Immediate forces Broadcast Frequency to Just Once on save. |
| Active | Checked | Indicates the record is available for use. |
| Target | Role | Defines the audience: Client, Role, User, or Everybody. |
| Role | POTS Admin | Specific role receiving the message when Target is Role; only users with an active assignment to this role are eligible. |
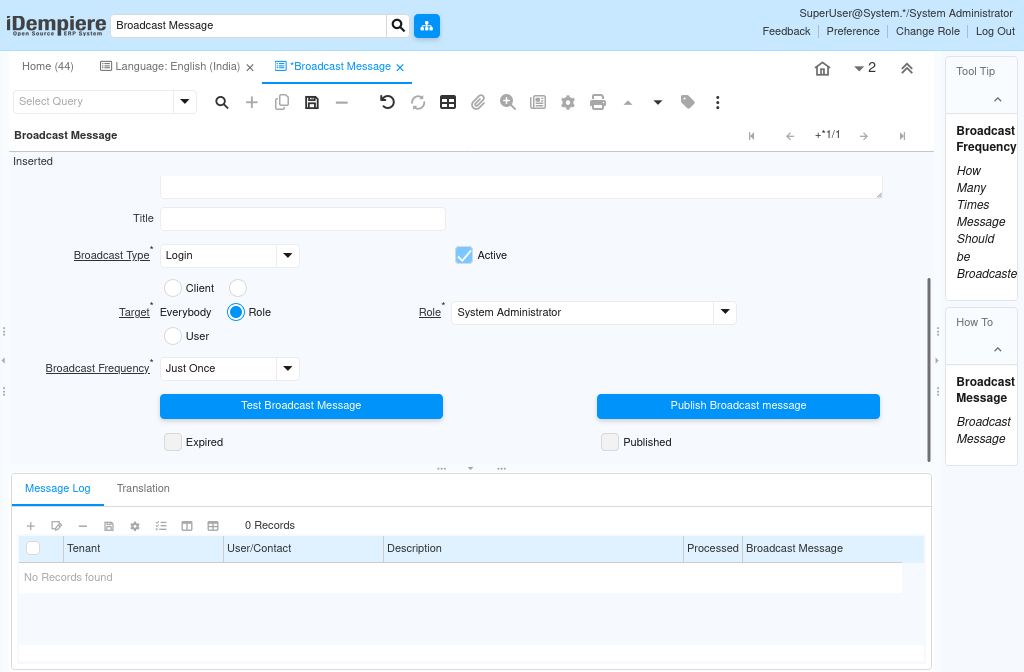
| Broadcast Frequency | Until Acknowledge | Controls how long the message keeps appearing; Until Acknowledge and Until Expiration or Acknowledge require the recipient to acknowledge the message. |
| Expired | Unchecked | Marks the message as no longer active once checked. |
| Published | Unchecked | Indicates whether the message has been published. |
Step 2: Test the Broadcast Message
Testing confirms the message displays as expected before it reaches the full target audience, reducing the risk of publishing errors.
Click Test Broadcast Message to retrieve and review the current message content exactly as it will appear to recipients.
Step 3: Publish the Broadcast Message
Publishing activates delivery of the message to the selected Target audience based on the configured Broadcast Type and Frequency.
Click Publish Broadcast message once the content and audience settings are confirmed. A confirmation dialog opens, prompting for the delivery method before the message is activated.
| Field | Sample Value | Description |
| Run as Job | Checked | When checked, processes the publish action as a background job instead of immediately. |
| Notification Type | Defines how recipients are additionally notified when the message is published. |
Selecting OK on the confirmation dialog publishes the message; selecting Cancel closes the dialog without publishing. Once confirmed, the Published checkbox is set and the message becomes visible to the target audience.
Step 4: Understand How Recipients Are Determined
Once published, the system evaluates each logged-in user against the Broadcast Type and Target to decide whether the message should display, ensuring only eligible users are addressed.
No manual action is required for this step; the system applies the following standard eligibility rules automatically each time a user logs in or an Immediate message is published.
| Broadcast Type / Target | Eligible Recipients | How Delivery Is Tracked |
| Immediate + Client | All active users belonging to the same Tenant as the message. | Displayed immediately; not logged as a Note. |
| Immediate + Role | Active users with a current, active assignment to the selected Role in the same Tenant. | Displayed immediately; not logged as a Note. |
| Immediate + User | Only the specific User selected on the message. | Displayed immediately; not logged as a Note. |
| Immediate + Everybody | All logged-in users, regardless of Tenant, Role, or User. | Displayed immediately; not logged as a Note. |
| Login (non-Immediate) | Determined by Target in the same way as above, evaluated at login. | Tracked through a Note record per user; the message is considered shown once a matching Note exists |
Step 5: Review the Message Log
The Message Log tab records each instance of the broadcast message delivered to a User or Contact, supporting delivery tracking and audit.
Open the Message Log tab under Broadcast Message to view or review individual delivery records.
| Field | Sample Value | Description |
| Tenant | POTS | Tenant associated with the logged message. |
| Organization | * | Organization associated with the logged message. |
| Message | (system generated) | Reference to the message delivered to the user. |
| User/Contact | (recipient) | The user or contact who received the message. |
| Workflow Activity | (optional) | Related workflow activity, if the message originated from a workflow. |
| Table | (optional) | Source table reference related to the message, if applicable. |
| Record ID | (optional) | Identifier of the related record, if applicable. |
| Reference | (optional) | Additional reference information for the log entry. |
| Text Message | (optional) | Plain text version of the delivered message. |
| Description | (optional) | Short description of the log entry. |
| Broadcast Message | (linked record) | Link back to the parent Broadcast Message record. |
| Processed | Unchecked | Indicates whether the log entry has been processed. |
Step 6: Configure Translations
Translations allow the same Broadcast Message to display in different languages depending on the recipient’s configured Language. Translated content may also include dynamic values that the system resolves for each recipient at display time.
Open the Translation tab, select the Language, and enter the translated Title and Broadcast Message content.
| Field | Sample Value | Description |
| Tenant | POTS | Tenant associated with the translation record. |
| Organization | * | Organization associated with the translation record. |
| Broadcast Message | 1000000 | Identifier of the parent Broadcast Message being translated. |
| Language | Spanish (Colombia) | Target language for this translation. |
| Active | Checked | Indicates the translation record is available for use. |
| Translated | Unchecked | Marks whether the translation has been completed. |
| Title | (blank) | Translated short heading for the message. |
| Broadcast Message | Hi Santhosh | Translated content of the broadcast message. |
Common Issues and Resolutions
| Issue | Cause | Resolution |
| Message does not appear to users | Published checkbox not set | Click Publish Broadcast message to activate delivery. |
| Role field is empty and cannot save | Target set to Role without selecting a Role | Select a valid Role before saving the record. |
| Message reappears repeatedly | Broadcast Frequency set to Until Acknowledge | Confirm users acknowledge the message, or adjust the frequency setting. |
| Message still shows after it should stop | Expired checkbox not selected | Mark the record as Expired to stop further display. |
| Translation not shown to user | Translated checkbox unchecked or Language mismatch | Verify the Translated checkbox and confirm the recipient’s Language matches. |
| No entries in Message Log | Message not yet published or delivered | Publish the message and confirm recipients match the Target audience. |
| Test preview does not reflect changes | Record not saved before testing | Save the header record, then click Test Broadcast Message again. |
| Message not published after clicking Publish | Cancel selected on the confirmation dialog | Click Publish Broadcast message again and select OK to confirm. |
| Recipients do not receive an email alert | Notification Type not set to EMail in the dialog | Reopen the publish dialog and set Notification Type to EMail before confirming. |
| Role-targeted message not visible to a user | User lacks an active assignment to the selected Role | Assign the user to the Role with an active status, or change the Target. |
Next Steps
- Role window – to manage roles available for Broadcast Message targeting.
- User/Contact window – to review recipients tracked in the Message Log.
- Language window – to maintain languages available for Translation.
- Workflow Activity window – to review related workflow-triggered messages.