How Does Work Notice in iDempiere
The Notice window in iDempiere shows system-generated messages such as posting errors, workflow alerts, and process results, so users know when something needs attention.
Notices are created automatically by the system, not typed in manually, and each one links back to the record or process that caused it.
Business Rules
- Notices are created automatically by the system; users cannot create one manually.
- Each notice can link to a Table and Record ID so users can trace it to the source record.
- The User/Contact field determines who the notice is intended for.
- Checking Acknowledge marks a notice as read and handled.
- The Workflow Activity field is populated only when a notice comes from a workflow step.
- The Text Message field holds the full detail of the error or alert.
Prerequisites
- A valid iDempiere login; each user can view the notices addressed to them.
- The action that triggers a notice, such as a document posting or a workflow step, must already have run.
- System Administrator access is needed to review notices belonging to other users.
Navigation
Menu → System Admin → General Rules → System Rules → Notice
Opening the window shows one notice at a time, with the record count in the top-right corner, along with details of what happened and where.
Configuration Steps
Step 1: Review the Notice (Notice Tab)
This is the only tab in the window, and it holds all the details of a single system notice.
Open the Notice window and read the Message, Text Message, and other fields to understand what happened and why.
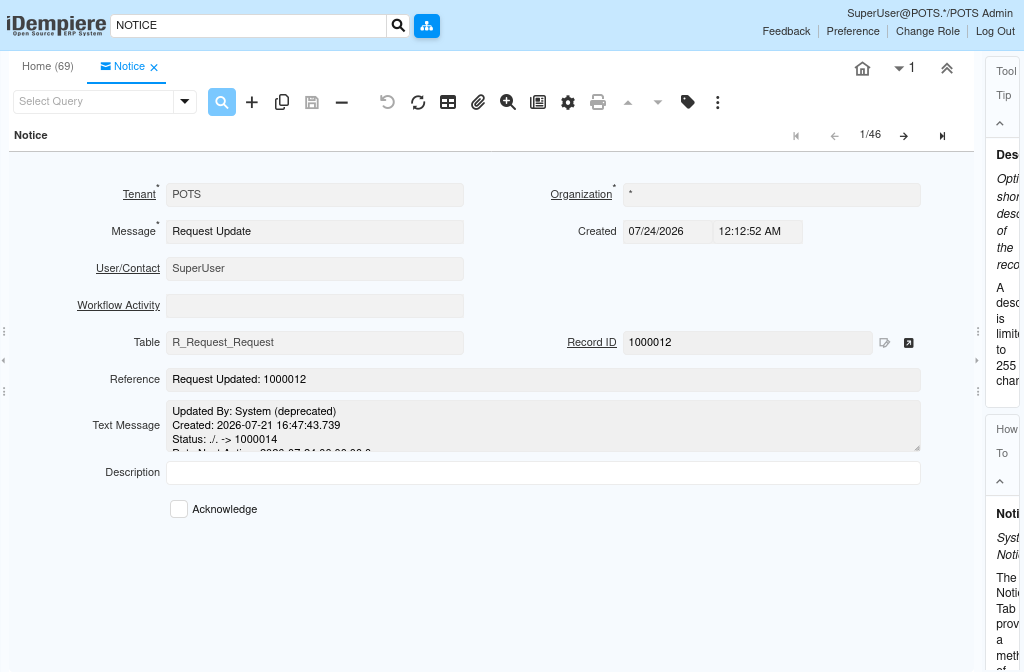
| Field | Sample Value | Description |
| Tenant | POTS | The tenant where the notice was generated |
| Organization | CDC | The organization linked to the source record |
| Message | Posting Error | Short summary or type of the notice |
| Created | 06/05/2026 10:29:24 AM | Date and time the notice was generated |
| User/Contact | Praveen | The user the notice is addressed to |
| Workflow Activity | (blank) | Linked workflow step, if the notice came from a workflow |
| Table | M_InOut_Shipment/Receipt | The table containing the record that caused the notice |
| Record ID | 1000003_06/05/2026 | Identifier of the specific record involved |
| Reference | MInOut[1000031-1000003,DocStatus=CO] | Short reference string describing the record |
| Text Message | Posting Error (Resubmit – No Costs for Adidas Sports Shoe)… | Full detail of the error or alert |
| Description | (blank) | Optional additional notes |
| Acknowledge | No | Marks the notice as read and handled |
Step 2: Trace the Source Record
When more detail is needed, the notice can be traced back to the exact record that caused it.
Use the Table, Record ID, and Reference fields to identify the record, then use the zoom icon beside Record ID to open it directly.
| Field | Sample Value | Description |
| Table | M_InOut_Shipment/Receipt | Identifies which window or table the record belongs to |
| Record ID | 1000003_06/05/2026 | Points to the specific record; the zoom icon opens it |
| Reference | MInOut[1000031-1000003,DocStatus=CO] | Readable summary of the record’s key details |
Step 3: Acknowledge the Notice
Acknowledging a notice confirms it has been read, so it no longer needs follow-up.
Once the notice has been reviewed and any needed correction made, check Acknowledge and save the record.
| Field | Sample Value | Description |
| Acknowledge | Yes | Confirms the user has read and handled this notice |
After completing this review, the notice is fully processed and ready for standard iDempiere record-keeping.
Common Issues and Resolutions
| Issue | Cause | Resolution |
| Notice count keeps growing | Notices are not being acknowledged | Open each notice, review it, and check Acknowledge |
| Cannot find the record that caused the notice | Table or Record ID is blank for some system-level notices | Review the Text Message field instead for the full detail |
| Notice text is hard to read | The Text Message field contains a long block of text | Expand the field or widen the window to read the full message |
| A notice is not visible to the current user | The notice is addressed to a different User/Contact | Have a System Administrator locate it by that User/Contact |
Next Steps
- Workflow Activities – review the workflow step if a notice originated from one.
- Sales Order, Invoice, or Shipment windows – open the referenced document to fix a posting error.
- Role window – confirm access rights if a notice references data outside the user’s access.
- Process Monitor – review background or scheduled jobs that generate recurring notices.