How to Configure Mail Template in iDempiere
Mail Template is the iDempiere window that stores reusable email Subject and Mail Text content, in plain text or HTML, for communications.
Businesses use it for product announcements, promotions, and customer reminders, personalizing each email with variables like @Name@ before sending.
The template itself only defines content; delivery is handled by processes such as Send Mail Text using the Tenant’s SMTP configuration.
Process Flow

Business Rules
- A Mail Template stores the email Subject and Mail Text.
- The HTML checkbox determines whether Mail Text is rendered as HTML or plain text.
- One Mail Template can be reused to generate emails for multiple recipients.
- Variables such as @Name@ are replaced with recipient-specific values during sending.
- The Mail Template does not select recipients, connect to SMTP, or deliver emails.
- Email delivery depends on the Tenant’s configured SMTP settings.
- Every email generated from a template is logged in the User Mail tab.
Prerequisites
- Tenant SMTP configuration completed (Mail Host, Port, Authentication, SSL/TLS).
- Recipient list available, such as Business Partner Contacts or Interest Area subscribers.
- HTML content prepared in advance if the template will use HTML formatting.
Configuration Steps
Step 1: Create the Mail Template Record
This establishes a reusable email content record that can be selected by sending processes.
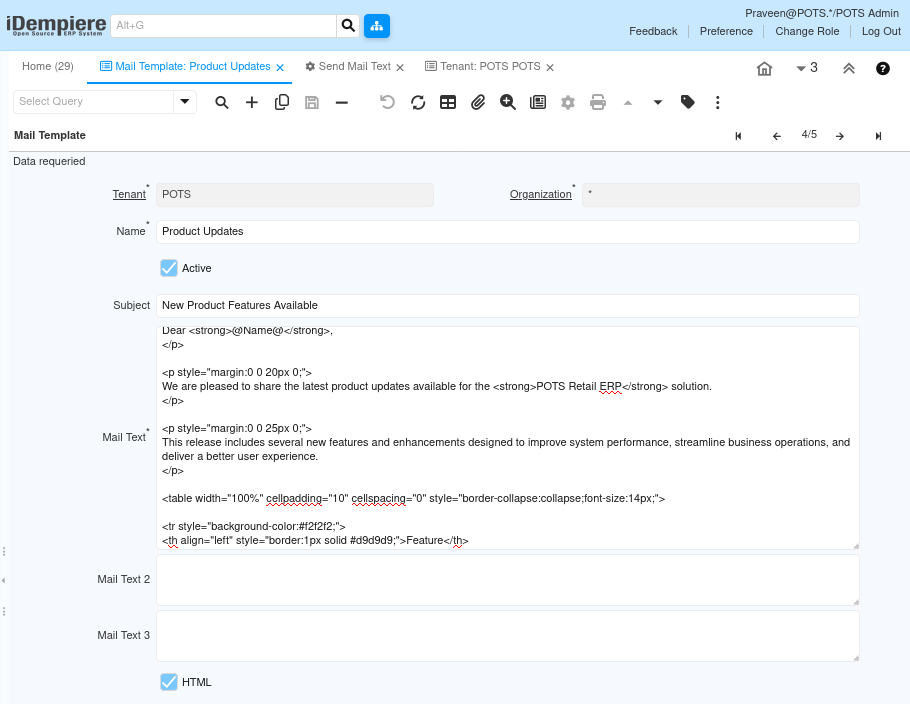
Navigate to Partner Relations → Marketing → Mail Template, click New, and enter a Name for the template.
| Field | Sample Value | Purpose |
| Name | Product Updates | Identifies the Mail Template for selection |
Step 2: Enter Subject and Set the HTML Option
The Subject defines the email header text, and the HTML checkbox controls whether Mail Text is interpreted as HTML.
Enter the Subject line, then check HTML if the Mail Text will contain HTML-formatted content such as tables and styled text.
| Field | Sample Value | Purpose |
| Subject | New Product Features Available | Text shown as the email subject line |
| HTML | Checked | Renders Mail Text as formatted HTML instead of plain text |
Step 3: Enter Mail Text with Personalization Variables
Mail Text holds the actual email body and supports variables such as @Name@ for per-recipient personalization.
Enter or paste the HTML or plain text content into Mail Text, placing @Name@ wherever the recipient’s name should appear.
| Field | Sample Value | Purpose |
| Mail Text | Dear @Name@, We are pleased to share the latest product updates for POTS Retail ERP… | Email body content with a personalization variable |
Step 4: Save the Template
Saving makes the template available for use in email-sending processes.
Click Save. The template becomes selectable in Send Mail Text and other standard processes that support Mail Templates.
Step 5: Review the User Mail Tab After Sending
Every email generated from the template through a sending process, such as Send Mail Text, is logged here for tracking.
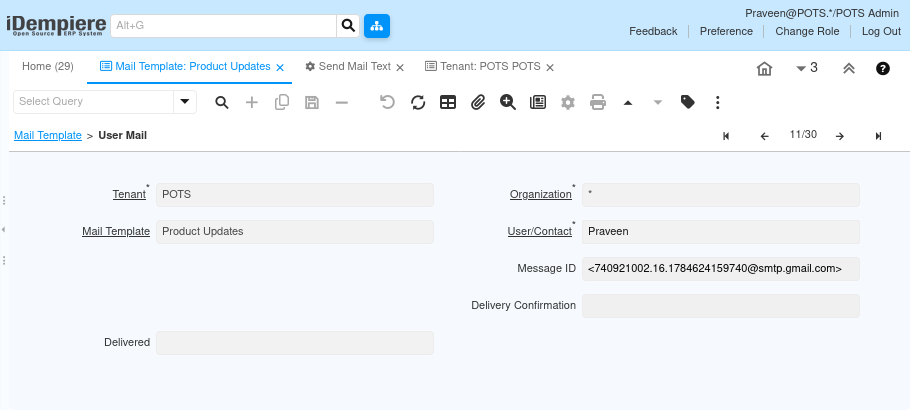
Open the User Mail tab under Mail Template to review each recipient’s Message ID, Delivery Confirmation, and Delivered status.
| Field | Sample Value | Purpose |
| User/Contact | Praveen | Recipient the email was generated for |
| Message ID | <246306575.27.1784625452446@smtp.gmail.com> | Unique identifier assigned by the SMTP server |
| Delivered | No / blank | Indicates whether delivery was confirmed by the mail server |
| Delivery Confirmation | Blank until confirmed | Records delivery confirmation details when available |
Common Issues and Resolutions
| Issue | Cause | Resolution |
| Email not delivered | SMTP configuration is incorrect | Verify Mail Host, Port, Authentication, and credentials |
| Variables are not replaced | Unsupported or incorrect variable name used | Use supported Mail Template variables such as @Name@ |
| HTML formatting is not applied | HTML option is disabled | Enable the HTML checkbox on the template |
| SMTP authentication error | Invalid SMTP username or password | Verify the configured SMTP credentials |
| Email sent without personalization | Recipient context was not set by the calling process | Use a standard process such as Send Mail Text, which personalizes each email |
| Delivered column shows No | Invalid recipient address or username at send time | Correct the recipient’s email address and resend |
| User Mail record missing for a recipient | Recipient was not included in the Send Mail Text run | Re-run Send Mail Text with the correct recipient list |
Next Steps
- Configure Tenant SMTP settings if not already done.
- Create recipient subscriptions or Business Partner contacts for the audience.
- Run the Send Mail Text process using this template.
- Review the User Mail tab to confirm delivery for each recipient.