How to Use the Create/Complete Table Process in iDempiere
The Create/Complete Table process in iDempiere automates the creation of a new database table, its mandatory system columns, and optional business columns in a single run. Running it correctly saves manual Application Dictionary work and keeps new tables consistent with iDempiere naming, security, and auditing standards used across sales, inventory, and accounting transactions.
Process Flow

Business Rules
- DB Table Name and Data Access Level are mandatory before the process can run.
- Mandatory columns AD_Client_ID, AD_Org_ID, Created, CreatedBy, Updated, UpdatedBy, IsActive are always added.
- A UUID column and unique UUID index are created automatically for every table.
- Selecting Create a Workflow forces DocAction, DocStatus, Processed, ProcessedOn and Processing columns.
- Re-running the process on an existing table only adds missing columns; existing columns are left unchanged.
- If Record_ID is zero and the table already exists, the process stops with an error.
- Create a Translation Table only copies columns already marked as translated, plus Name, Description and Help.
- Active records (IsActive = Y) are the only records available for later transaction entry.
Prerequisites
- System Administrator role with access to System Configurator functions.
- Entity Type configured in Application Dictionary (for example, User maintained).
- Naming convention agreed for the new table (avoid reserved prefixes like AD_ or M_).
- Data Access Level decided in advance (Client, Client+Organization, System, or System+Client).
- Target module or retail process identified so table purpose is documented.
Navigation
System Admin → System Rules → Table and Column → Create/Complete Table (Process)
Configuration Steps
Step 1: Define the Table Identity
Enter the DB Table Name in plain database-safe format, then add a business-friendly Name and Description. Name defaults to the table name if left blank.
| Field | Sample Value | Description |
| DB Table Name | R_LoyaltyTier | Physical database table name; must be unique. |
| Name | Loyalty Tier | Business label used in Application Dictionary and windows. |
| Description | Retail customer loyalty tier master | Short explanation of the table’s purpose. |
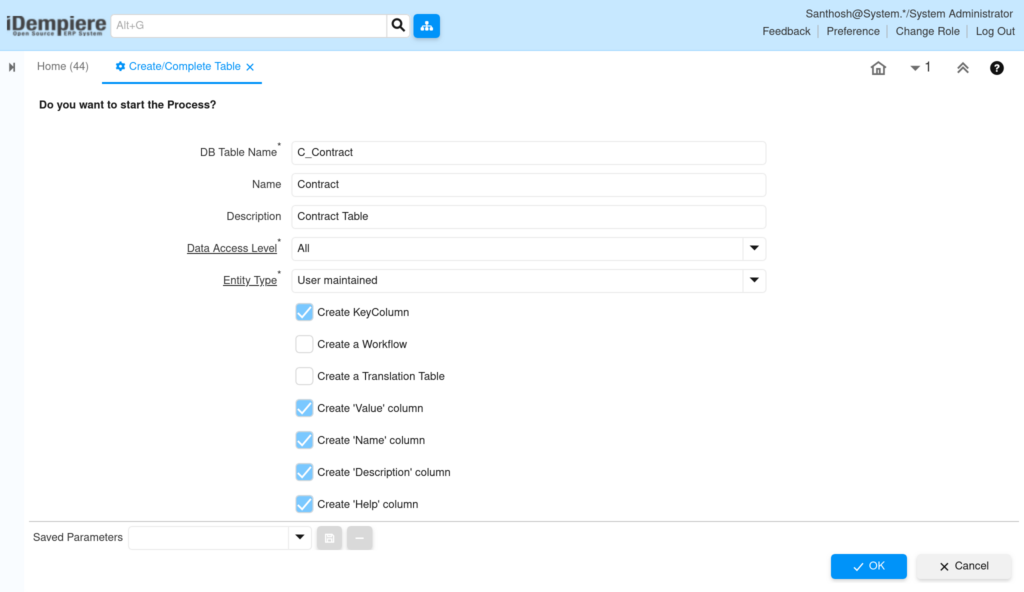
Step 2: Set Data Access Level and Entity Type
Choose Data Access Level based on whether stores or the whole retail chain share the data. Keep Entity Type as User maintained for store-specific customizations.
| Field | Sample | Purpose |
| Data Access Level | Client+Organization | Restricts data visibility by client and store organization. |
| Entity Type | User maintained | Flags the table as a custom addition, not core iDempiere. |
Step 3: Configure Key and Identifier Columns
Keep Create KeyColumn checked for a new master table. Enable Value, Name, Description and Help so the record has a code, label and search text.
| Field | Sample | Purpose |
| Create KeyColumn | Checked | Generates the <TableName>_ID primary key column. |
| Create ‘Value’ column | Checked | Adds a short code field, for example LOY-GOLD. |
| Create ‘Name’ column | Checked | Adds the identifying label shown in lookups. |
| Create ‘Description’ column | Checked | Adds free-text notes for internal reference. |
| Create ‘Help’ column | Checked | Adds extended help text shown as a tooltip. |
Step 4: Add Transactional and Reference Columns
Enable only the columns the process needs. Skip this step for simple master tables like loyalty tiers or store attributes.
| Field | Sample | Purpose |
| Create ‘DocumentNo’ column | GC-2026-000123 | Stores the unique document number of a transaction. |
| Create ‘DateTrx’ column | 04-Aug-2026 | Records the transaction date. |
| Create ‘DateAcct’ column | 04-Aug-2026 | Records the accounting date for posting. |
| Create ‘C_Currency_ID’ column | USD | Links the record to a currency for value tracking. |
| Create ‘SalesRep_ID’ column | Store Associate 12 | Links the record to the responsible sales representative. |
| Create ‘AD_User_ID’ column | Customer Contact | Links the record to a system user, for example a customer contact. |
Step 5: Enable Document Workflow Columns
Check Create a Workflow if the table represents a document that must move through Draft, In Progress and Completed states. This automatically adds the DocAction and DocStatus columns.
| Field | Sample | Purpose |
| Create a Workflow | Checked | Builds a document workflow and links it to the DocAction button. |
| Create ‘DocAction’ column | Complete | Adds the toolbar button that drives document status changes. |
| Create ‘DocStatus’ column | Drafted | Tracks the current document status. |
| Create ‘Posted’ column | Not Posted | Tracks whether accounting entries were generated. |
| Create ‘IsApproved’ column | N | Flags whether the document passed approval. |
Step 6: Enable Multi-Language Support (Optional)
Check Create a Translation Table only if the table needs per-language Name, Description or Help values. This generates a linked _Trl table automatically.
Step 7: Run the Process
Review all selected checkboxes, then click OK. Enable Run as Job only for long-running builds; otherwise leave it unchecked for immediate execution.
Common Issues and Resolutions
| Issue | Cause | Resolution |
| “Table already exists” error | Table name matches an existing record and Record_ID is zero | Use a new table name or open the existing Table record to modify it. |
| Workflow button missing after run | Create a Workflow was left unchecked | Re-run the process on the same table with Create a Workflow checked. |
| New columns not visible in any window | Table creation does not build Window, Tab or Field records | Manually create Window, Tab and Field entries from Application Dictionary. |
| Data Access Level error on save | Mandatory Data Access Level left blank | Select a valid access level before running the process again. |
| Column silently not created | Column already exists on the table | Check the Table and Column window; existing columns are skipped, not overwritten. |
| Translation table missing expected fields | Source columns were not marked as translated before running | Enable Name, Description or Help translation flags, then re-run with Create a Translation Table checked. |
| Custom table lost after upgrade | Entity Type left as default core value | Set Entity Type to a custom value such as User maintained before running. |
| UUID index creation fails | An index with the same generated name already exists | Rename the conflicting index or drop it before re-running the process. |
Next Steps
- Create Window, Tab and Field records so retail users can enter data through the UI.
- Assign the new table to relevant Roles under Data Access Level for store-level security.
- Add the window to a Menu entry for retail store or head-office access.
- Configure Document Type and Sequence if the table uses DocumentNo and workflow columns.
- Set up printing or reporting formats if the table feeds retail reports.