How to Configure Shipping Processor Configuration in iDempiere
Introduction
The Shipping Processor Configuration window in iDempiere defines how the system connects to an external carrier or freight service, using a Shipping Processor Java Class to handle rate calls, labels, and tracking.
It is used in Material Management when shipments to customers require carrier-specific rating, packaging, and pickup options rather than manual freight entry.
This configuration directly affects shipment processing, tracking accuracy, and carrier-related reporting across the tenant and its organizations.
Process Flow Diagram

Business Rules
- Active records are available for shipment processing; inactive processors are excluded from selection.
- Host Address and Host port are mandatory for the processor to connect to the carrier system.
- A single Shipping Processor Configuration can hold multiple Shipper records.
- Shipper records exist only under a parent Shipping Processor Configuration.
- Tracking URL, when set on a Shipper, enables shipment tracking directly from iDempiere.
- International, Saturday Delivery, and Residential flags control which delivery services a shipper supports.
- Proxy fields are optional and used only when outbound calls route through a proxy server.
- Shipping Processor Class must reference a valid Java class implementing the shipment processor interface.
Prerequisites
- Tenant (Client) configured.
- Organization configured.
- Business Partner and Shipment (Customer) window available for shipment processing.
- Java class for Shipping Processor Class (e.g., MFreightShipmentProcessor) available in the system.
- User role with access to Material Management setup windows.
Navigation
Menu → Material Management and Pricing → Material Management Rules → Shipping Processor Configuration
On opening, users see the header form (Tenant, Organization, Name, Host Address, Host port, Proxy fields, Shipping Processor Class) with a Shipper tab grid below listing configured shippers.

Configuration Steps
Step 1: Create the Shipping Processor Configuration
This step establishes the base connection record the system uses to reach the carrier’s service.
Instructions
Enter Name and Description, set Active, provide Host Address and Host port, then enter the Shipping Processor Class. Save the record before adding shippers.

| Field | Sample Value | Description |
| Name | Freight Table Shipment Processor | Identifies the processor configuration |
| Host Address | 0.0.0.0 | Carrier service endpoint address |
| Host port | 0 | Port used to connect to the carrier service |
| Shipping Processor Class | org.adempiere.model.MFreightShipmentProcessor | Java class implementing the processor logic |
Step 2: Configure Proxy Settings (if applicable)
Required only when outbound requests to the carrier must route through a network proxy.
Instructions
Enter Proxy address, Proxy port, Proxy logon, and Proxy password if the environment requires proxy routing; otherwise leave these fields blank.
Step 3: Add a Shipper Record
Each shipper record represents a specific carrier or service level under the processor, such as Blue Dart Express.
Instructions
Open the Shipper tab, click New, enter Name and Description, set Active, and enable Online Access if the carrier supports API-based calls.
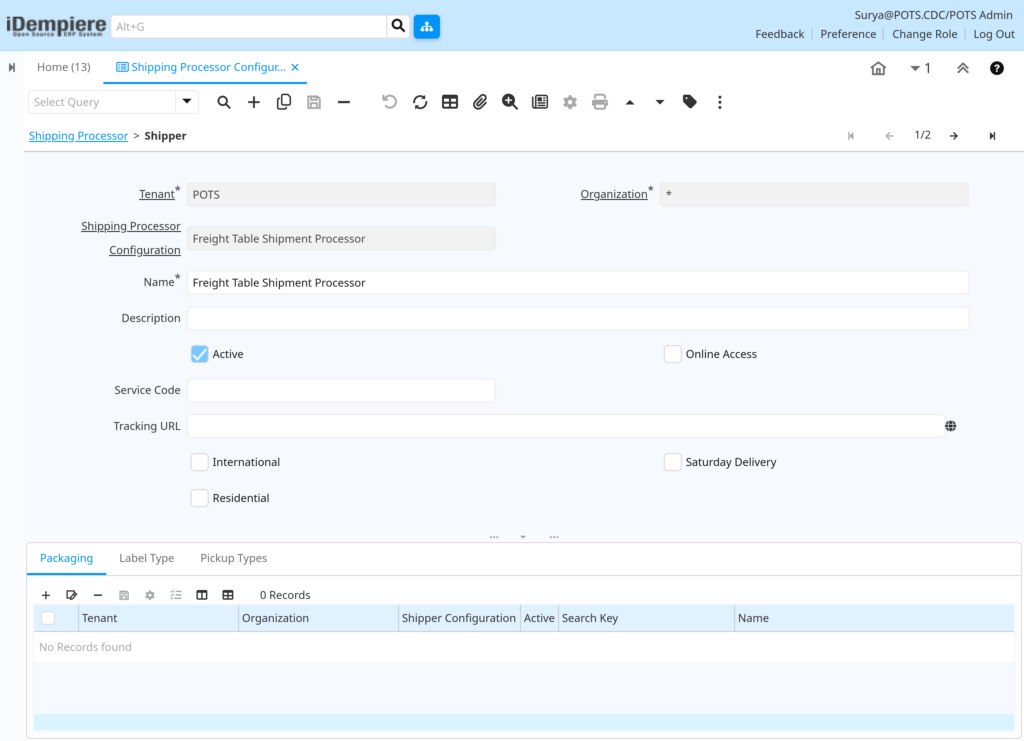
| Field | Sample Value | Purpose |
| Name | Blue Dart Express | Identifies the shipper or carrier |
| Service Code | (carrier-specific) | Carrier’s internal service identifier |
| Tracking URL | (carrier tracking link) | Template used to track shipments |
Step 4: Set Shipper Service Options
These flags determine which delivery capabilities are available when this shipper is selected on a shipment.
Instructions
Check International, Saturday Delivery, or Residential based on the carrier’s actual service capability, then save the Shipper record.
Step 5: Configure Packaging, Label Type, and Pickup Types
These sub-tabs define package sizes, label formats, and pickup schedules used when generating shipments with this shipper.
Instructions
Open Packaging, Label Type, or Pickup Types under the Shipper tab and add records matching the carrier’s supported packaging, label, and pickup options.
Note: Sub-tab records (Packaging, Label Type, Pickup Types) are only available once the parent Shipper record has been saved.Common Issues and Resolutions
| Issue | Cause | Resolution |
| Shipment fails to connect to carrier | Host Address or Host port is incorrect or unreachable | Verify Host Address and Host port against carrier documentation |
| Proxy connection errors | Proxy address, port, logon, or password incomplete | Confirm all proxy fields with the network team |
| Shipper not available during shipment entry | Shipper record is inactive | Set the Shipper record to Active |
| Tracking link not shown for shipment | Tracking URL not configured on Shipper | Add a valid Tracking URL template |
| Processor class not found error | Shipping Processor Class name is invalid or misspelled | Verify the class matches an installed Java implementation |
| Saturday or International delivery not offered | Related flag not checked on Shipper | Enable the relevant checkbox on the Shipper tab |
| Duplicate shipper entries | Multiple shippers created with the same name | Use unique, descriptive shipper names per carrier |
Next Steps
- Configure the Shipment (Customer) window to select the new shipper.
- Set up Packaging types for accurate freight and box-size calculation.
- Configure Label Type templates to meet carrier compliance requirements.
- Review Pickup Types to align shipment generation with logistics scheduling.